Featured post

Interlocking Butterfly Card and Crafters Companion Subscription Box Review

first seen on Scrapbooking With ME I made this card from the products included in box 3 and some ink from my stash...

Saturday 22 September 2018

Interlocking Butterfly Card and Crafters Companion Subscription Box Review


Wednesday 6 June 2018

L J Designs: Pop-up Card

L J Designs: Pop-up Card: Have a special occasion coming up?  Make your card pop with this demo.   What you will need A card blank 15cm x 30cm (sco...

Tuesday 5 June 2018

Pop-up Card

Have a special occasion coming up? 

Make your card pop with this demo.


What you will need


A card blank 15cm x 30cm (score down middle to make square card blank)
141/2cm x 29cm card or thick paper (scored down center to make pop up)
co-ordinating card 14cm x 14cm for card front
a ruler
a scoring tool 
scissors 
 a pencil 
wet glue
and a glue stick
a selection of colour papers, toppers and embellishments for decorating

First thing to do is to fold the card base and pop up piece, making the fold crisp with a bone folder or  ruler edge. be careful if using ruler edge that you don't tare the card or paper.

Next we are going to do the measuring....

Taking the 141/2cm x 29cm piece measure along the fold 11/2cm  at each end and make a mark.
Turn card and starting at each of the marks come in 3cm and mark, join these marks with a line.
Repeat this two more times starting at the previous line and reduce the line by a fraction each time.


 the first line 3cm, then 2.7cm and 2,5 cm (or there abouts, a ruff guide) 

This is so you don't cut through completely the tabs that will make the pop up.

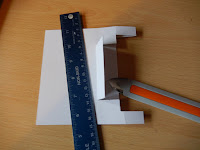
Cut along the first 2 lines and then butt the ruler against the cut lines and push the middle section against with bone folder or finger to make the fold impression. 
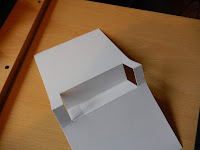
open out carefully and depress the fold so it sits inside. as in photo.

Repeat these steps cutting each line, and depressing folds until you have something like this, 

Remember!
Do not cut all the way to the end of line leave a couple of mm.
This makes the little tabs. 


 Burnish all folds Alternating Mountain and Valley folds until you have the middle step section and using the Glue stick attach one side to inner card blank, then when in position attach the other side.


you could use wet glue or sticky tape but glue stick is good for an even coverage with some wiggle room.


Now all you need to do is decorate with topper on front and embellish the stepper inside. Have fun and if you like this demo please Subscribe for regular Demos.  


would love to hear what you think 
 LJ ✗


Monday 14 May 2018

Hunkydory In the Garden POP BOX fold card 


To make this card you will need:
Hunkydory in the Garden members gift from Create and Craft. 
A4 Card blank (i used Ivory Hammer)
a smaller piece of card stock 33/4 by 3" for inside.
Wet Glue
Something to score the card with (scoreboard, Cutting machine with scoring tool or ruler and embossing tool).
Double sided Tape (optional you can use the Glue)
Coordinating Gems (again optional)
a shaped die for the Aperture (or cutting blade)
i also used a die to cut 2 small trees in pops but you can omit these or use something else the goes with the garden theme.  


Firstly trim the A4 card to 11" by 81/4" and Cut in half along the short side to make 2 11" by 41/8 card blanks. 

Score 1 of the card blanks at 51/2 and the other at 23/4, 51/2 and 81/4. fold at the scorelines to make a mountain, valley, mountain fold like the picture below.

This is where you will need to cut the apertures, leaving approx. 3/4" to 1" at the bottom to hide the strips. now score the 33/4" card @ 1/2 at each side and trim strips at 3/4" to make 4 strips. 

  
On the Base with only one fold make a small pencil mark at 23/4 and position the first strip just behind and the other equally spaced as in picture. Use wet glue but use sparely as less glue will dry quicker and will give a better hold. 


 Glue only one side of the top card down and position the tabs facing up, before attaching to the strips make sure they are all evenly spaced with no overlap. if the strips overlap trim excess. and when satisfied with strip position glue the other side in position


 At this stage cut a 3/4" decorative border strip from the Garden card stock and attach to the front with double sided tape. (you can also use wet glue but i found the tape held better).


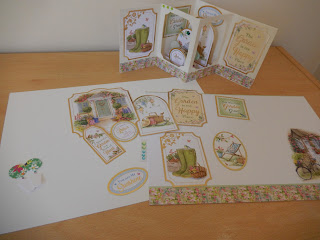
Decorate the card with other elements from the kit and add any Gems, Bows or other embellishments. On my card i used a large topper on the front and a frame to section off a area to add a sentiment. 


 To finish off the look i used a small potted tree die and some card from the kit. The die is a Sheena Douglas Landscape Die part of the Cottage set.

I am sure now that you know the basics you will come up with numerous themes and adaptations to this card style, Have fun    
I will be using this card for my Demo this week so let me know how you get on if you decide to try it for yourself. i have used the Hunkydory kit the Create and Craft was giving as a members gift, don't worry if you didn't get the kit for free you can still purchase this  on the site while stocks last. the idea came from Maymay https://youtu.be/JIjePeW_uDo loved it so much i just had to have a go.

Sunday 29 April 2018

Oriental Bloom Triple Tier Slider Card


Triple Tier Slider Card

 
With this card "How to" I have used Hunkydory Oriental Bloom. 
This card kit is form a couple of years ago but I have seen a few still for sale doted around on the web from  official stockists and the auction sites.  
The tier style of the card is also available in other kits from Hunkydory and other suppliers. 

(or you could design your own, I will demo this soon).


First step
Press out the smallest three-panel section and fold along the score lines. Bend the 8cm x 2.5cm foiled section to create the pull and stick it to the top of the center panel before closing and sealing the panels with High-tack tape.


Step 2     
Take the foiled three-panel section and fold it inwards with the slots portion on the right-hand side. Thread a 12cm printed band through the slots, wrong side upwards: fold the ends over each other and stick, making sure that the band will be loose enough to move up and down.
  
Step 3  
Repeat step 2 with the large three-panel section and the other band.


Step 4
To build the layers, add Hi-tack tape to the bands and fix the smaller section in place, making sure that the band is at the lowest point and the layer is below the top of the larger section.

 Step 5

Put Hi-tack tape on the outer edges of the layers and seal them before moving on to the next layer.


Step 6

Pull up the layers and fix the sentiment tag to the lower one and the foiled tag to the top one. using double-sided tape or glue.


Final Step

Complete the card by adding the frame to the front then centering the topper through the aperture. (i did not add the topper). 

Okay now that is the kit as it was meant to be, but i thought the lovely foiled card is hidden with this design. the kit comes with 4 triple tier cards so i used 2 in their organic form and them used 2 of the kits in my own adapted design. 

Oriental Side Stepper Card

I put this together with Hunkydory Adorable Scorable, the Triple Slider card kit, a small selection of Create and Craft card Illusions and Glitter, a  Die'sire Flower Die and Filigree Feathers Dies from Docrafts.  
please let me know what you think of this style and if you would like me to do a demo on this, 
but for now here are a few more images of the cards 


 Thank you, more to come soon.